Is anyone else as big of a pig about the garage during the winter as me? Most of the year I keep it pretty much under control. It gets a bit messy here and there after projects and sometimes that takes me a little time to put back right. However, in the winter, I hate cold! I'm a total wimp if its below 55.
My general m.o. is to run out to my garage and toss stuff someplace, anyplace, so long as it's not going to get run over by my car or make my husband trip over it and scream at me. I have no desire to spend any time in the garage and I cringe every time someone opens the garage door for fear a passer-by will see in. In the summer I leave the doors wide open while I'm working outside. Gotta keep that crap picked up!
Spring has been so strange around SE Michigan this year. It comes in fits and starts with cold spells that rival the dead of winter! Most years I have the beginnings of my vegetable garden out and the yard mostly cleaned up by now. This year... not so much.
I did manage to overseed my front yard last week on a nice day. Hope nothing germinated yet, since it has been SNOWING for the last two days. I also cleaned out the perennials, and raked a little around the deck making it look clean for spring. Still a lot to do there.
Today I went in the horrible garage; I had to pick my way through and got my hair snagged in a rake, tripped over a pile of bubble wrap and managed to knock over all the bikes. That was about two feet in the door! So, what did I come in here for? [sigh].
Long story short, the garage is... clean(ish). Whew!... I might just want to go out there and do stuff now!
Sunday, April 21, 2013
Monday, April 8, 2013
Lesson Learned
I did a bit of poking around in my perennials this weekend and I learned a few things I will share with you.
1) the electric fence I installed around the deck to keep critters out is in fact working.
2) It is in fact "safe" to get shocked by said electric fence. (as in, it won't kill you or anything bad).
3) Just like the direction booklet said, "Safe, but extremely unpleasant", is 100% accurate and I can personally attest to that extremely unpleasant part.
And one more thing-
4) When a skunk tries to go over/under the electric fence, he is caught by surprise and feels compelled to deliver his safe, but extremely unpleasant stink to our noses which lasted for days in the house!
Thursday, March 28, 2013
Raccoon Trouble
Quite suddenly we began hearing noises in the night. Animal noises. Wild, growling, and chattering, sometimes squealing. Whenever we looked outside, nothing. Floodlights on, nothing. Go outside and look around, nothing. Come back in the house, and the noise would start all over again. Thankfully this was all going on outside the house rather than in.
The trouble was that every time a noise was heard, our dog would lose her mind and start running around the house barking. Well, not so much barking, but more of a screaming really. The biggest problem with this, aside from being really annoying, was the behavior usually occurred while we were attempting to sleep. Sometimes we could hear scratching noises up against the foundation walls of our house, and this would also elicit the screaming behavior from our dog. It was clear to us that sleeping through the night just wasn't possible.
What to do? After about 3 nights of this, with no relief, I decided it was time to call in the professionals. My trusty Exterminator was put on notice and he arrived that very day with a trap baited with a can of stinky cat food and set it outside our bedroom doors next to the deck footing where the Raccoon had been living. The Exterminator assured me that this would do the trick.
And it surely did! Just as darkness fell, we looked out the back windows and caught a glimpse of a masked marauder sniffing out the cat food bait, and SNAP, just like that... we bagged our first Raccoon! I was so excited that I called the Exterminator right then, even though it was near 10:00pm.
I decided I would sleep upstairs with the dog that night. I didn't want to hear herbark scream all night knowing there was a caged wild animal right outside our bedroom doors. We also moved the trap (containing the Raccoon) around to the side of the house in case it made noise in the hopes that we would be able to get some much needed sleep.
Morning came, my husband told me he continued to hear the noises off and on all night, but since the dog wasn't downstairs to bark, it wasn't bad. I went out to check on our prisoner (I was actually afraid it might get loose somehow) and found what we discovered to be a female Raccoon "in heat" (pungent odor!) in the trap. All around the trap was blood. Blood on the outside of the trap, blood on the walls of the house, blood on the ground, blood on the garbage cans. GROSS! Obviously other Raccoon were fighting over her and we had quite a few of them! So much for our theory that there was just a breeding pair!
The Exterminator came to take the furry prisoner away (I really don't want to know about what he did with her) and set the trap again. After another day or so, this really wasn't necessary. Apparently the only reason the other Raccoon were present was to mate with the female, who was now gone. Problem solved.
So, what about next time? What's to stop more animals (possibly skunk? god forbid!) from taking up residence under our deck? The answer was nothing. We have dealt with this very question since moving into our house two years ago. Sometimes we had Raccoon, sometimes Woodchuck living under our deck. The Woodchuck hide underneath waiting for the perfect moment to snatch my vegetables or flowers from the gardens. I've tried digging barriers in, I've tried putting landscape timbers around the bottom of the deck, and even big rocks. No matter what I put there, they just dig under.
The solution I came up with was this: electric fencing. I did some research and it sounded very DIY friendly, and was even affordable. I was already $150 into it with the Exterminator, so what's another hundred bucks at this point? Certainly its cheaper than hiring the Exterminator again.
I ordered a kit designed for either keeping pets in, or keeping critters out. We're talking small critters, not deer. I modified the 30" posts so that I could create a very short fence (about 4-5" high) and have it completely underneath the face board of our deck. The electric wire was just far enough off the ground so if something tried to dig under, it would get a zap. Likewise, if something tried to climb over, it would also get a zap.
Once the kit arrived, I raked all the dead plant material away from the deck perimeter to get a clear picture of the space I wanted to protect. Then cut all the fence posts, which served as both post and insulator, down to roughly the height of the space between the soil and the bottom of the deck fascia boards. The posts got banged into the soil using a hammer (the ground was still kind of frozen), then I strung the wire as tautly as possible, from one end of the deck to the controller box and attached the wire to the terminal screw using a little plastic tightening knob. I ended up running two wires, one each direction, to create continual coverage around the perimeter since my electric outlet is at the corner of my deck. A third wire connects from the ground terminal to a copper rod (3 feet long) which was also banged into the soil using a hammer. From there, all I needed to do was plug in the controller (energizer) panel and test the wire to make sure it was hot.
A simple circuit is created when someone/thing touches the fence wire while standing on the soil. The current flows through the fence wire from the controller and then through the soil via the grounding rod and back to the controller through the grounding wire, thereby giving the toucher a "highly unpleasant, but safe" shock.
I will keep this device operational all year long, in the hopes that no more animals decide that underneath our deck is a great place to live. I also hope this eliminates a lot of beasties eating my flowers and veggies this summer!
What to do? After about 3 nights of this, with no relief, I decided it was time to call in the professionals. My trusty Exterminator was put on notice and he arrived that very day with a trap baited with a can of stinky cat food and set it outside our bedroom doors next to the deck footing where the Raccoon had been living. The Exterminator assured me that this would do the trick.
 |
| Little Miss Trouble |
And it surely did! Just as darkness fell, we looked out the back windows and caught a glimpse of a masked marauder sniffing out the cat food bait, and SNAP, just like that... we bagged our first Raccoon! I was so excited that I called the Exterminator right then, even though it was near 10:00pm.
I decided I would sleep upstairs with the dog that night. I didn't want to hear her
Morning came, my husband told me he continued to hear the noises off and on all night, but since the dog wasn't downstairs to bark, it wasn't bad. I went out to check on our prisoner (I was actually afraid it might get loose somehow) and found what we discovered to be a female Raccoon "in heat" (pungent odor!) in the trap. All around the trap was blood. Blood on the outside of the trap, blood on the walls of the house, blood on the ground, blood on the garbage cans. GROSS! Obviously other Raccoon were fighting over her and we had quite a few of them! So much for our theory that there was just a breeding pair!
The Exterminator came to take the furry prisoner away (I really don't want to know about what he did with her) and set the trap again. After another day or so, this really wasn't necessary. Apparently the only reason the other Raccoon were present was to mate with the female, who was now gone. Problem solved.
So, what about next time? What's to stop more animals (possibly skunk? god forbid!) from taking up residence under our deck? The answer was nothing. We have dealt with this very question since moving into our house two years ago. Sometimes we had Raccoon, sometimes Woodchuck living under our deck. The Woodchuck hide underneath waiting for the perfect moment to snatch my vegetables or flowers from the gardens. I've tried digging barriers in, I've tried putting landscape timbers around the bottom of the deck, and even big rocks. No matter what I put there, they just dig under.
 |
| Zareba Pet and Garden electric fence kit |
I ordered a kit designed for either keeping pets in, or keeping critters out. We're talking small critters, not deer. I modified the 30" posts so that I could create a very short fence (about 4-5" high) and have it completely underneath the face board of our deck. The electric wire was just far enough off the ground so if something tried to dig under, it would get a zap. Likewise, if something tried to climb over, it would also get a zap.
 |
| Fence post sticking out of the ground- I pushed them back underneath the deck so I won't shock myself while gardening and so plant material won't interfere with the electric current. |
 |
| Controller or "Energizers" come in electric, battery, or solar. This one is an AC electric model. I mounted it inside a plastic box to keep it safe from weather. The grey box has a cover once installation was completed. |
I will keep this device operational all year long, in the hopes that no more animals decide that underneath our deck is a great place to live. I also hope this eliminates a lot of beasties eating my flowers and veggies this summer!
 |
| The most important step is to check the wire to make sure there is current flowing. This is safely done using a tester, rather than your hand! OUCH. |
 |
| I put caution signs up, just in case the critters can read. :0) |
 |
| This is the actual kit with various pieces before in installed them. Here's to happy sleeping, and a successful harvest! |
Friday, August 17, 2012
What to do with all those tomatoes!?
I've been busy in the yard all summer with more projects than I care to think about. (http://thegardenanticipated.blogspot.com/ ). Meanwhile the tomatoes just keep cranking out more and more fruits! So today I will show you how I make my homemade Marinara, or Spaghetti Sauce!
I start by putting a large pot of water on the stove to boil. While the water heats up I begin washing all the tomatoes and cutting a shallow slit in the skin on the bottom of each tomato. Once the water is at a good boil I put a few tomatoes at a time in the pot and wait until I can see the skin where I cut the slit begin to separate and pull away. The idea is not to cook the tomatoes, merely to loosen the skin. When I have reached that goal, the tomatoes are removed from the boiling water with a slotted spoon and placed immediately in cold water. Preferably ice water. I usually fill my kitchen sink with cold water and dump in a good amount of ice. This boiling and cooling process should take about 3 minutes total (half in hot and half in cold).
You could cut the tomatoes in half first and scoop out all the seeds with your finger- seeds are not pretty in spaghetti sauce. I used to do that, and found it very tiresome. I found a tomato mill at William Sonoma for making sauce. This tool is a huge time saver if you plan on making sauce every year and not at all expensive. Here is a link if you want to buy one: http://www.williams-sonoma.com/products/italian-tomato-press/?pkey=e%7Citalian%2Btomato%2Bpress%7C2%7Cbest%7C0%7C1%7C24%7C%7C1&cm_src=PRODUCTSEARCH||NoFacet-_-NoFacet-_-NoMerchRules-_-
 I set up my mill on my kitchen table. I have granite counters and for some reason the suction cup on the bottom sometimes doesn't stay attached to the granite, which then makes an enormous mess. My old house had laminate counters and this was never an issue. I put one bowl under the main outlet in front and a smaller one on the side to catch the "waste". I always run the waste back through the mill FOUR MORE TIMES to extract all the good stuff! When you are finished there is basically nothing but seeds and pasty gunk. This could go back in your compost if you do that. The main bowl, I empty that frequently into my stock pot so it doesn't over flow and its easier to get out from under the spout if its not too full.
If you don't have a tomato press, just cut the tomatoes in half cross-wise, not top to bottom, and scoop the seeds out using your finger and discard. Cut the tomatoes up small or put them in a food processor or blender if you prefer. Proceed the same way from there.
So now you have a full stock pot of tomato puree. It can be chunky if you prefer not to use the mill. To that I add a couple of chopped onions, about 6-8 cloves of chopped garlic, 2-3 anchovies (optional), a teaspoon or so of salt, half teaspoon or so of ground black pepper, a couple dashes of hot pepper flakes, and a teaspoon of sugar. I also like to use fresh herbs, but dry ones are fine too. Adjust the quantity accordingly and to taste. I use a good fistful of fresh basil leaves, perhaps 1/2-3/4 cup chopped, 3-4 sprigs of oregano leaves chopped, 5-6 sprigs of fresh thyme leaves. You could be totally lazy with the herbs and just tie them together "bouquet garni" style with a string and let their flavors permeate the sauce while it cooks and then toss when it's done, but I like the little bits of green throughout my sauce. Sometimes I put in a chopped green pepper or so if I have one. You could add olives- green or black if you like. Chopped or grated zucchini, carrots, mushrooms, etc. Really whatever add-ins you like. I usually keep it simple for a basic sauce.
Another option is to saute the onion and garlic in a little olive oil until tender, but not brown, first and then add to the tomato. This is up to you. Sometimes I do, and sometimes I don't.
I turn the whole pot up to high to get it cooking, then turn the heat down to a nice low bubbly simmer. The pot should cook until it is reduced by half or more. You will notice over time it becomes a darker, richer color and the sauce gradually becomes thicker. Just watch the heat so it doesn't scorch on the bottom and stir occasionally.
Once my sauce is complete, I let it cool completely and divide it up in vacuum seal bags and freeze for later use. Every year I try to shoot for at least 2 dozen 2-cup bags of frozen marinara. Right now I'm up to about 10, so I've got several more batches to make. I'm due to start a new batch today as there are upwards of 30 tomatoes on my kitchen counter and more on the vines out back ready to pick!
Buon Appetito!
 |
| This is a near daily load from my garden! |
 |
| slit the tomato skin with a small serrated knife. |
 |
| blanching the tomatoes |
Once the tomatoes are cool enough to handle, I slip the skins off and cut the cores out of each tomato. Depending on how large the tomato, I cut it up in smaller chunks- maybe an inch or two square.
 |
| peeled tomatoes |

If you don't have a tomato press, just cut the tomatoes in half cross-wise, not top to bottom, and scoop the seeds out using your finger and discard. Cut the tomatoes up small or put them in a food processor or blender if you prefer. Proceed the same way from there.
 |
| tomato puree ready to season and cook |
 |
| seasonings for the sauce |
Another option is to saute the onion and garlic in a little olive oil until tender, but not brown, first and then add to the tomato. This is up to you. Sometimes I do, and sometimes I don't.
I turn the whole pot up to high to get it cooking, then turn the heat down to a nice low bubbly simmer. The pot should cook until it is reduced by half or more. You will notice over time it becomes a darker, richer color and the sauce gradually becomes thicker. Just watch the heat so it doesn't scorch on the bottom and stir occasionally.
 |
| seasoned sauce ready to stir and cook |
Buon Appetito!
 |
| completed sauce |
Saturday, April 28, 2012
Trash To Treasure: Pallet Fence Project
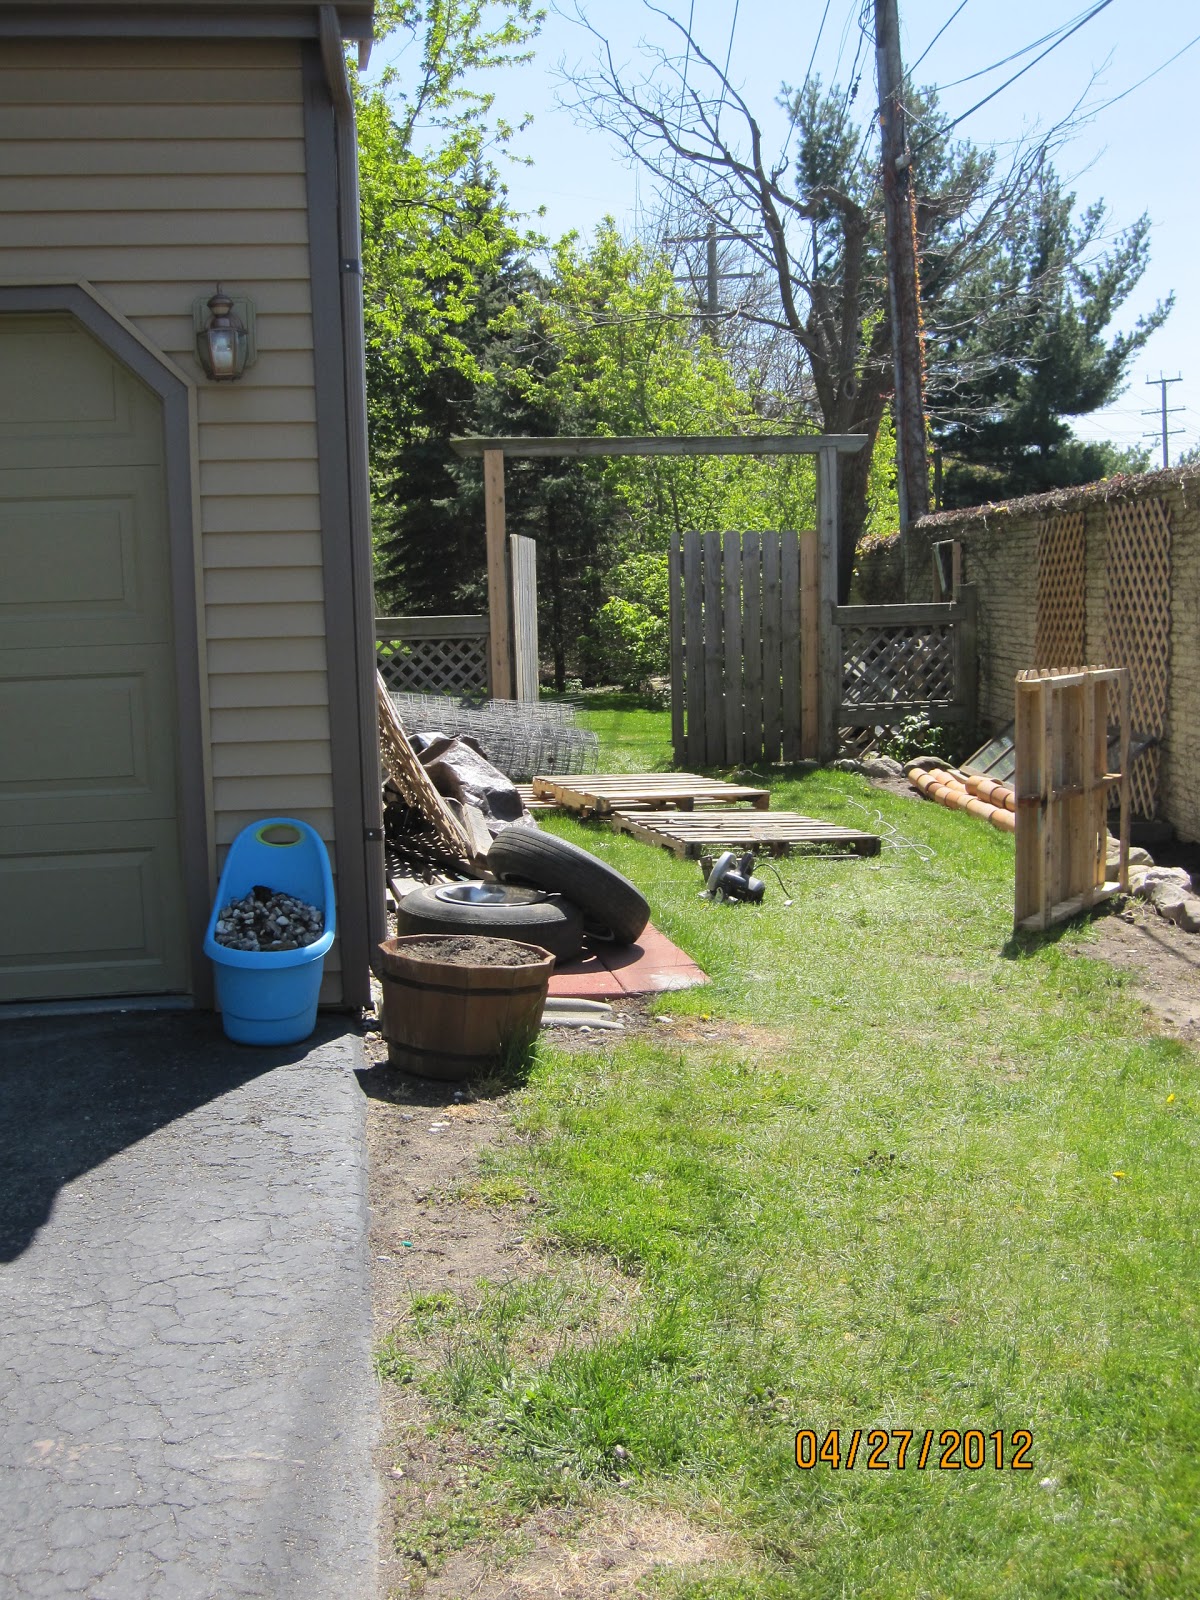 I am so tired of chasing my garbage cans all over the yard and down the street on a windy day. We've had a lot of windy days lately! Furthermore, the cans look horrible sitting next to the garage. Plus there's all those random building materials and a pair of old tires someone dumped in our back 40 next to the garage. We tried putting the tires in our dumpster while we were remodeling, but the dumpster dude who picked it up after our remodel wasn't fooled and he pulled the tires out and left them next to the garage door. That's where they still were to this morning. So what's a girl to do with all that hideousness and no money to spend?
I was poking around on Pinterest the other day and came across a really clever project done by Desiree Guy over at Camelot Art Creations. She simply used an old wood pallet and some paint to make a really cute fence. Wouldn't you know that very same day I saw a stack of pallets listed on Freecycle? So I of course hopped right over there and put them in my little clown car. Have I told you about my car?
 I brought the pallets home and stacked them in the ugly zone with all the other random building materials beside my garage of course! My husband came home and rolled his eyes at me. He's not a big believer in the whole "trash to treasure" mind-set.
So yesterday was the perfect day, sunny and not too chilly. I spread the pallets I got from a fellow Freecycler out on the grass to pick out the best one for the job. I was looking for one with fairly even spacing of the face slats, not too wide, not too broken, etc. Once selected I set about gently prying out the nails holding the face slats to the top board. They needed convincing with a pry bar and hammer, but I had to be careful not to break or split the wood.


Next I marked off a nice even triangular corner on both sides of the top of each board and cut those with a saw. I would have used my jig saw, but remembered that I didn't have any blades. I keep forgetting to buy those. Don't you hate that? So,


Now, to get the little "fence" to stand up, the easiest way was to first make sure the ground was more or less level. I left it a little bit of a slope downward away from the house to make sure any rainwater would flow away from the house and not pool up. However, I didn't want it to be a hugely noticeable slope. Then I took two welded steel fence posts (the sort you bang into the ground with a big hammer) and well... banged them into the ground with a big hammer. A 5-lb baby sledge to be exact. From there, I stood the new picket fence section up against the t-posts and ran several screws through the holes in the metal posts into the back side of my former wood pallet turned fence.

Two coats of paint, including the green metal t-posts on the back side, really made the whole "pallet" idea disappear and it truly looks like it was never meant to be anything other than what it is right now. Lastly, I decided it needed a little more cuteness, so I hung three flower pots on little cuphooks on the face of the new fence and put some pretty pansies in them.
As for those flower pots, they were 3 medium sized terra cotta pots I had laying around from last summer. I painted them with some leftover paint from my house colors to make them color coordinate and tie the whole look together. I also had an extra solar landscaping path light, so I drilled a hole in the top corner of the fence and stuck the solar light into the hole like a fence post lantern. This is really great when I need to take the trash out at night so I can see the cans (no I don't have a light on the side of my house!).

So, if you find yourself in possession of some wood pallets, I challenge you to come up with something great and send me a picture of what you made!
Friday, April 27, 2012
Rainy Day Gardening: Garden Markers!
As I stood with my face pressed to the glass looking longingly out my back door at the garden, the rain and cold kept me safely inside the house. What to do with myself? So I got to thinking I needed some new garden markers for my new patch of bliss out back!
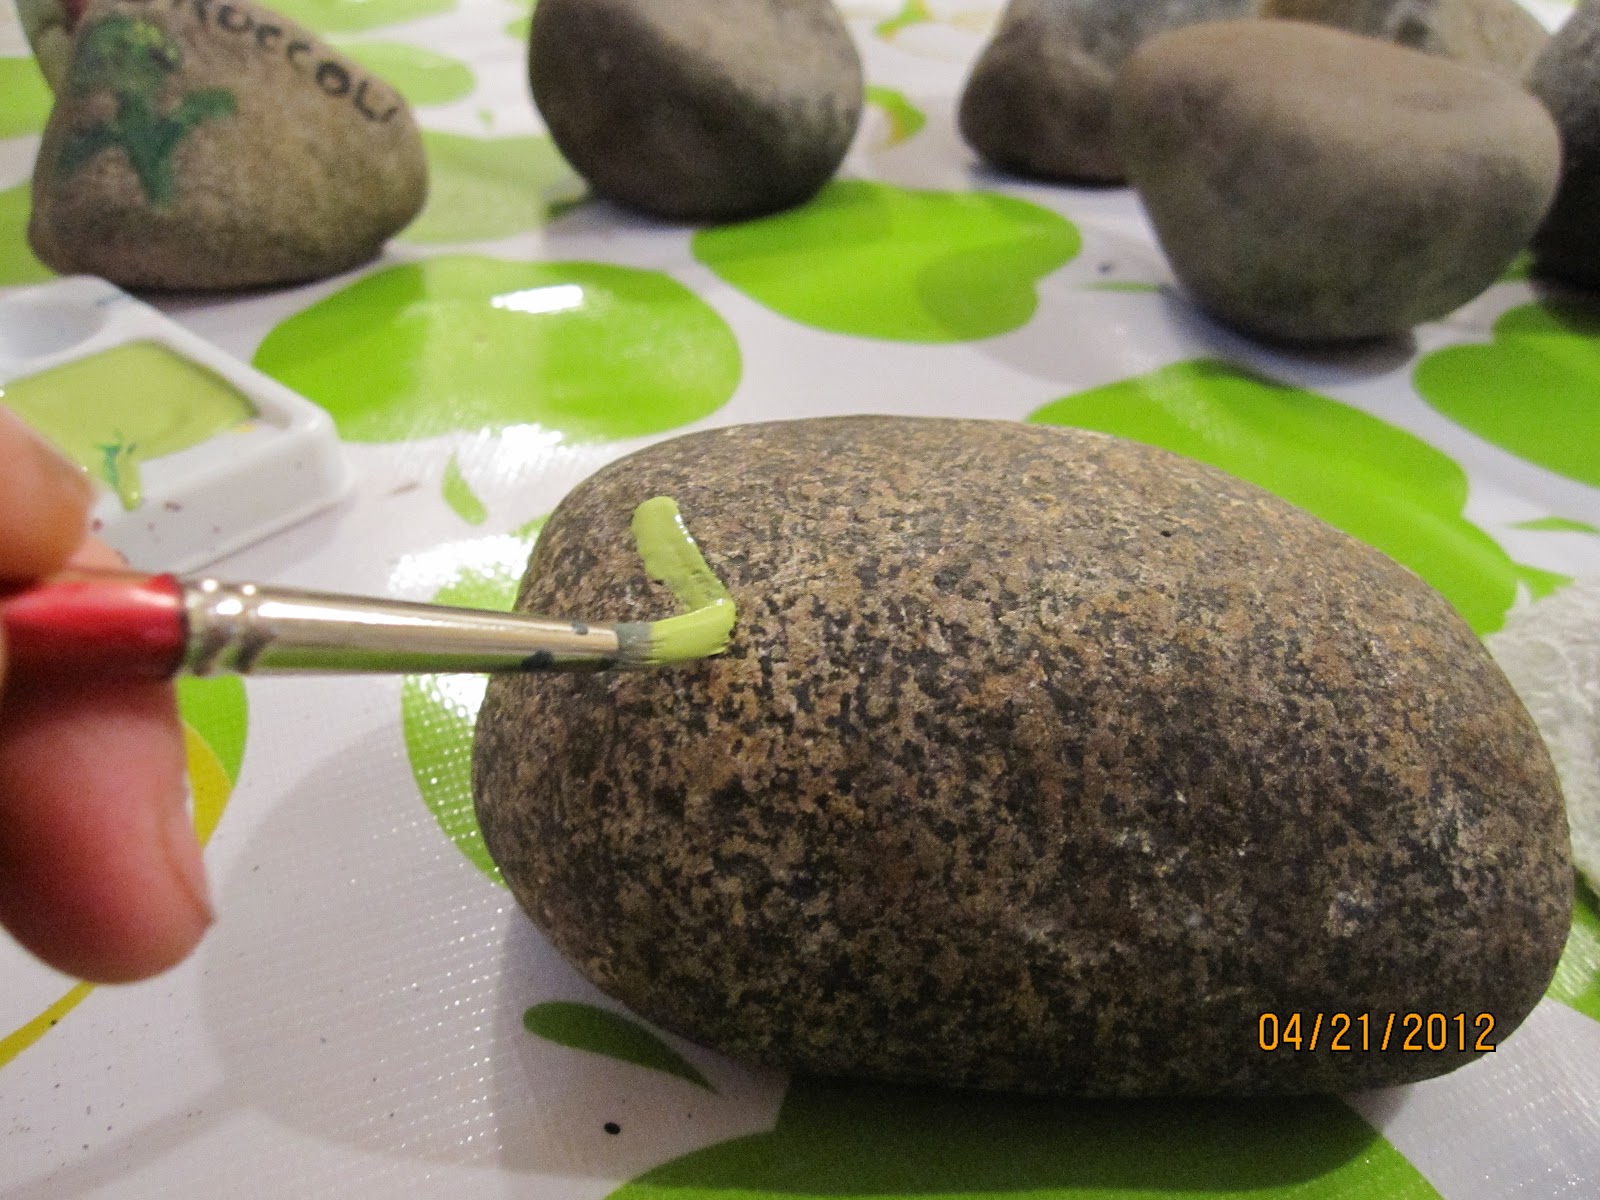
I put on my rubber garden clogs, a jacket and grabbed a wire trash can and headed out back to collect some baseball-sized rocks. I was looking for smooth-ish ones, not jagged or lumpy. The rocks need to have pretty flat areas for painting on. This isn't a big chore around my house as the previous owners had some sort of rock fetish and must have bought a dozen truck loads of rock in various shapes and sizes from small gravel sized all the way up to boulders almost as big as me!
All I needed to do was clean them up a bit, so a quick wipe down with damp cloth and let them set to dry for a little while. Then I was ready to get started.
I began by painting rough shapes of the vegetable. You could just do words or anything you like, but don't be afraid of making "mistakes". They are just rocks. You could always bury them if they embarrass you! Or paint over them, or wash them off before the paint dries! Besides, the first coat will look pretty lame.
After the initial shape dries, go back with another color- maybe just slightly darker or lighter, and add a little shadow or highlight to begin defining shapes. For example on my "PEAS" rock, I started with a spring green pointed oval shape to represent the pod, then took a darker green and made round peas on top of the pod shape. You could make these very flat color combos so they look quite stylized and cartoon-like, or more gestural and less "perfect" like mine.
After the second color(s) dry a bit, take some black paint and a small brush to put the lettering on. I decided the black didn't really read well, so I outlined in white. Perhaps it would be easier to paint a white band on first and then put the lettering on top of that, but you wouldn't get the shape of the letters. Either way would be fine, the band of white would be much easier to do though.
Once everything is completely dry, I took a fine point Sharpie (permanent) marker and drew in some details and outlines on the vegetable to really make it look the way I wanted it to. As you can see, the little painted veggies really begin to look nice at this point. They don't have to be perfect, but they should make you smile when you look at them rather than hang your head in shame. It's a fun project that serves a valuable purpose. It isn't rocket science or anything!
To complete the job I took the rocks back outside once the sun came out and I put 3 coats of clear spray lacquer to preserve the paint job. These should hold up nicely for several years use.
I put on my rubber garden clogs, a jacket and grabbed a wire trash can and headed out back to collect some baseball-sized rocks. I was looking for smooth-ish ones, not jagged or lumpy. The rocks need to have pretty flat areas for painting on. This isn't a big chore around my house as the previous owners had some sort of rock fetish and must have bought a dozen truck loads of rock in various shapes and sizes from small gravel sized all the way up to boulders almost as big as me!
 |
| rocks ready to be painted |
 |
| supplies I used: acrylic paint, water, rag, brushes, marker, clear lacquer |
I began by painting rough shapes of the vegetable. You could just do words or anything you like, but don't be afraid of making "mistakes". They are just rocks. You could always bury them if they embarrass you! Or paint over them, or wash them off before the paint dries! Besides, the first coat will look pretty lame.
After the initial shape dries, go back with another color- maybe just slightly darker or lighter, and add a little shadow or highlight to begin defining shapes. For example on my "PEAS" rock, I started with a spring green pointed oval shape to represent the pod, then took a darker green and made round peas on top of the pod shape. You could make these very flat color combos so they look quite stylized and cartoon-like, or more gestural and less "perfect" like mine.
 |
| Starting is the hardest part |
 |
| Add lettering using a small brush |
 |
| Two colors on the pea plus black lettering |
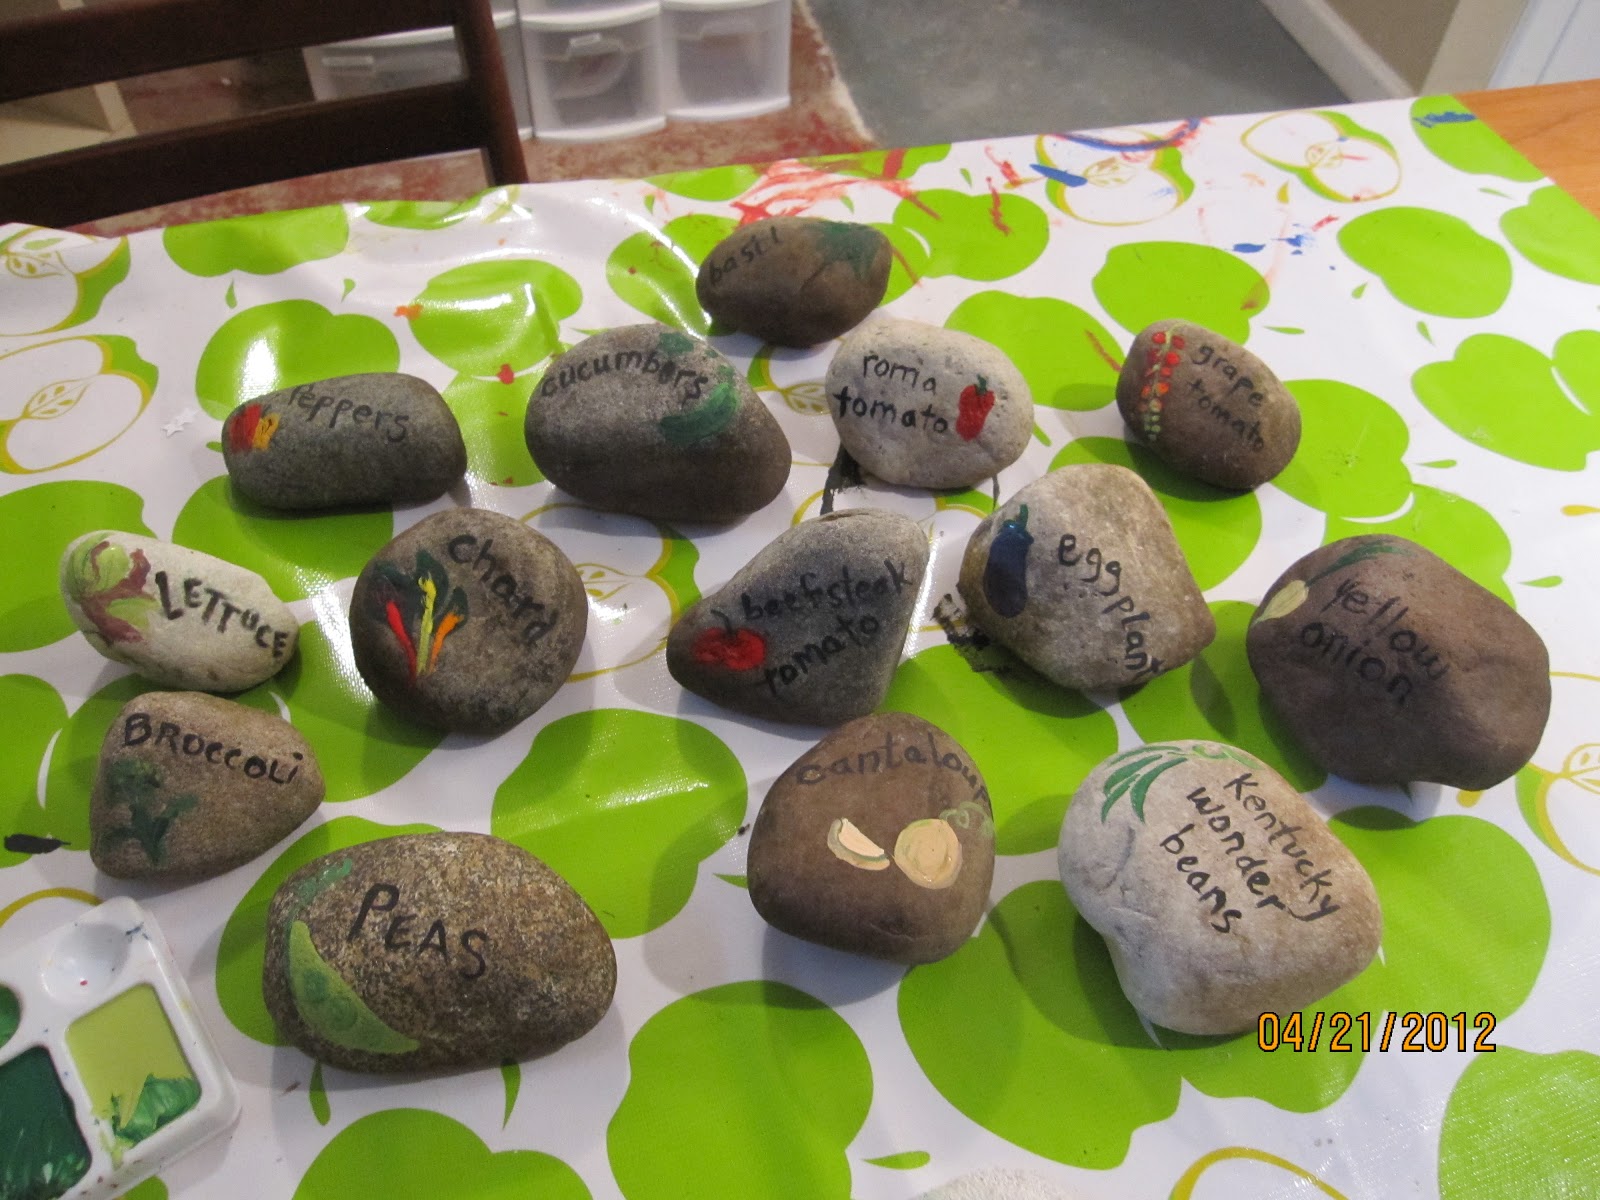 |
| Here are all my rocks with finished letters and veggies. They look kind of BLAH. |
 |
| adding white outlines to make the design "pop" |
 |
| Sharpie marker makes adding fine details easy |
 |
| painting complete |
| finished rocks with clear lacquer coating ready for the garden |
To complete the job I took the rocks back outside once the sun came out and I put 3 coats of clear spray lacquer to preserve the paint job. These should hold up nicely for several years use.
Wednesday, April 11, 2012
What's For Dinner?: Crab Arugula Salad
I know, this all sounds pretty exotic, right? Well, not really. Readily available ingredients and basic equipment is all you need, and about 30 minutes to whip up something that seems pretty impressive. Hey, if I could do it in 20 minutes including taking a bunch of pictures, surely you can do it in 30!
 |
| Crab Arugula Salad |
To begin, make the dressing first:
 |
| dressing ingredients and equipment |
I used to just buy the cheap machines and treat them as semi-disposable. I would use them for a few years until they broke or the blade was too dull to cut and then I would buy a new one. Then I finally realized if I bought a good one it wasn't that much more expensive and it would last a lot longer. I have the basic medium-sized Cuisinart model, which comes with a general purpose top, and a chopping top and blades. Pictured here is the general purpose top.
The Cuisinart food processor has a tiny cup/stopper that goes in the center hole of the lid to prevent stuff from flying out, and it also has a nifty feature which I will use when preparing the dressing, which is essentially homemade mayonnaise using lime instead of lemon.
 |
| Cuisinart Food Processor lid cap |
See the little lid with tiny hole in the center? The hole is the perfect size for adding the oil at the ideal rate for making mayonnaise. I will explain more as we move along.
 |
| how to separate an egg |
 |
| adding the oil with machine running |
Now, put the little cup (if you have one) onto the lid and begin filling it with 2/3 cup vegetable oil. Just keep refilling it as it runs out into the bowl of the processor. If you don't have this feature, just pour it VERY slowly through the opening in the lid.
See how slowly I mean by checking out the picture here:
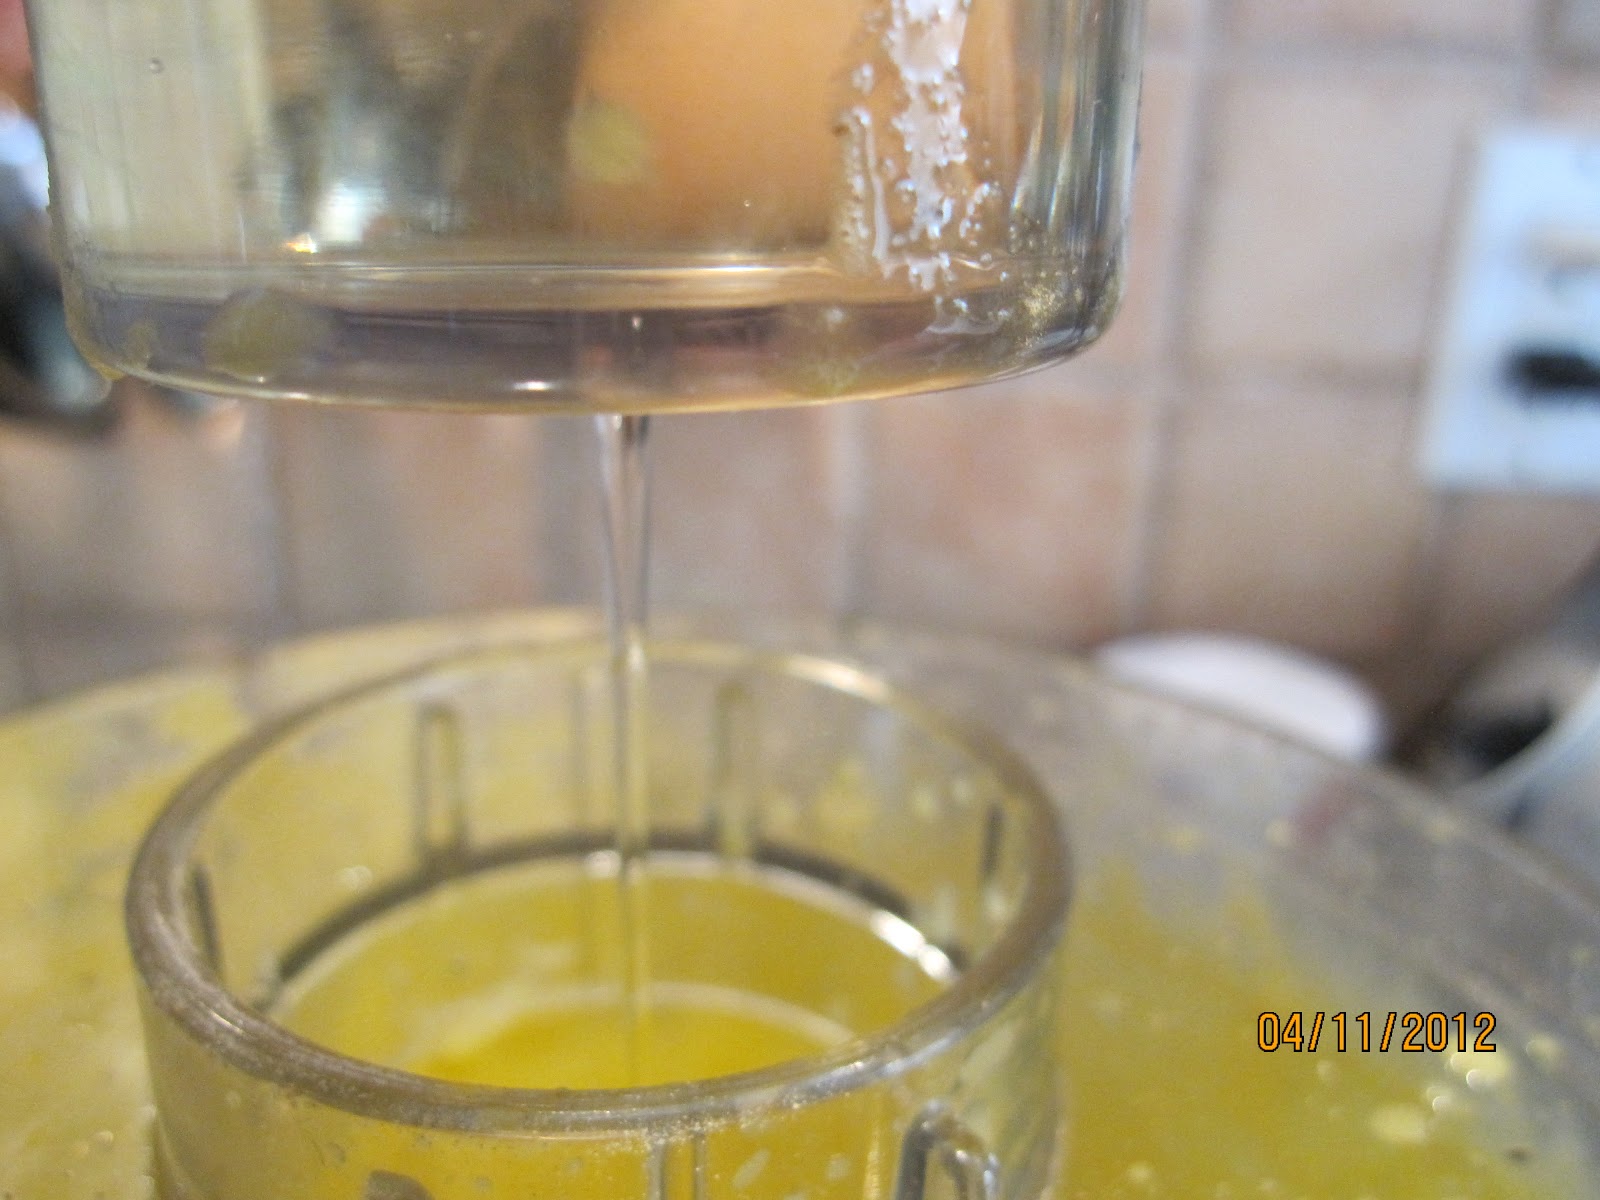 |
| a very slow trickle of oil into the mix is critical |
Once you have added all the oil, you will have a nice thick white-ish mayonnaise. I'm using this as the main dressing for the salad. You could easily double the recipe and keep half of it in the refrigerator for a week or so to use on sandwiches and such. Won't your family be impressed?
 |
| finished mayonnaise dressing |
 |
| peeling the jicama |
Now to finish up, peel a small jicama (hick-uh-muh)- a brown bulb vegetable with texture and taste similar to raw potato or water chestnut. I like to peel it by cutting off both ends to a make flat surface for sitting on my cutting board, then I whack off the outer peel with my chef's knife. You could use a regular peeler or paring knife if you prefer.
 |
| jicama matchsticks |
 |
| mixture of fresh arugula and baby spinach |
 |
| 16 oz can crabmeat in the refrigerated section of your market |
In a separate bowl mix 1 pound crab meat-I bought this 16 oz can in the refrigerated section at Trader Joe's for about $8. WOW! What a deal! Sure, you could use fresh crab, (are you rich?) or even use imitation crab if your budget is really tight, which makes this an affordable every-day option. In with the crab, I mix 2-3 green onions, sliced up (green AND white parts), 1/2 cup chopped fresh cilantro, and all of the mayo dressing we made up above.
Here it is all mixed up with the dressing:
 |
| dressed crab meat mixture |
Enjoy! (ingredient list follows)
Crab Salad:
16 oz crab meat
2-4 green onions, green and white parts, chopped
1/4-1/2 cup fresh cilantro, chopped
Green Salad:
4 cups fresh arugula leaves (or combination of arugula and baby spinach)
juice of 1/2 lime (approx 2 tsp)
1 tbsp olive oil
salt and pepper to taste
Mayonnaise Dressing:
2 egg yolks
1 tsp dijon mustard
1/2 tsp salt
1/4 tsp pepper
juice of 1 lime (2 tbsp)
2/3 cup vegetable or canola oil
Preparation time: 30 minutes
can be made ahead, leave dressing off green leaves until ready to serve to prevent wilting. Hold in the refrigerator up to 2 days.
Subscribe to:
Posts (Atom)